
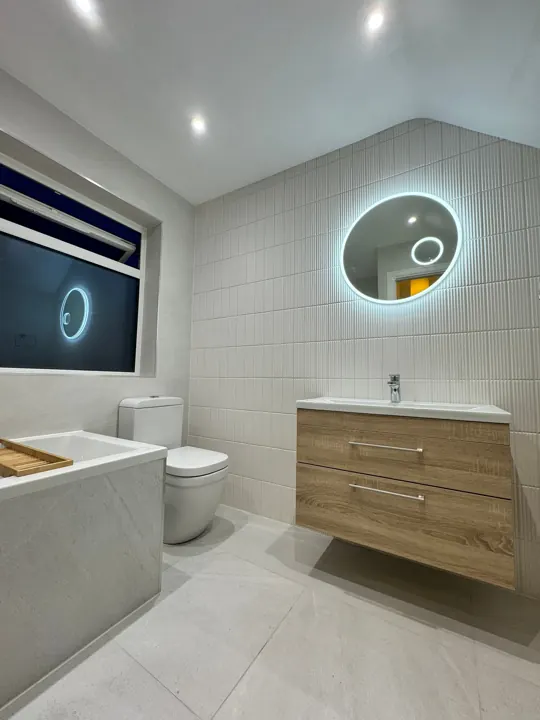
Microcement bathrooms have a particular appeal: continuous surfaces, soft mineral tones and none of the visual interruption of grout lines. In the right property, they can make a compact en-suite feel calmer and more generous, or give a larger family bathroom the considered finish of a boutique hotel. However, the quality of the result depends far less on the final colour sample than on the preparation behind it.
For homeowners planning a substantial bathroom renovation, microcement should be treated as a complete finishing system rather than a quick alternative to tiles. It needs a stable background, correct waterproofing, carefully detailed junctions and an experienced hand at application. Get those elements right and it is a refined, practical choice built to last.
What is microcement in a bathroom?
Microcement is a thin decorative coating made from fine cement-based materials, polymers, pigments and sealers. It is applied in several layers, typically over a prepared substrate, to create a lightly textured, joint-free surface. Although it has a concrete-inspired appearance, it is not the same as pouring a concrete floor.
Its thin build-up is one reason it can be useful during refurbishment. In certain conditions, microcement can be applied over existing tiles, cement boards or screeded floors, avoiding the extra depth associated with some new floor finishes. That does not mean every old tiled bathroom is a suitable candidate. Loose tiles, movement in the floor, hollow areas and poor previous workmanship must be addressed before any coating is considered.
The finish can be used on walls, floors, vanity splashbacks, bath surrounds and, with the correct specification, within shower areas. Colours range well beyond grey, from warm limestone and sand shades to charcoal, clay and softer off-whites. Samples are valuable, but they should be viewed in the actual room as daylight, downlights and the surrounding brassware can change how a colour reads.
Why homeowners choose microcement bathrooms
The principal advantage is visual continuity. With no grout grid breaking up the walls or floor, a room can feel quieter and less busy. This is particularly effective in awkwardly shaped bathrooms, where cuts around boxing, alcoves or sloping ceilings might otherwise create a patchwork of tiles.
Microcement also suits a more tailored layout. A low-profile shower tray can blend discreetly into the floor, while a built-in bath or bespoke joinery can be finished with a related tone. The material works well alongside natural timber, painted cabinetry, brushed nickel and aged brass, but it is not limited to one design style. The final look can be softly matt and understated or more dramatic, depending on the chosen shade and degree of movement in the application.
Cleaning is straightforward because there is no grout to scrub or recolour. A pH-neutral cleaner and soft cloth are generally all that is needed for routine care. That said, a joint-free finish is not a maintenance-free finish. Sealed microcement still needs sensible cleaning products and occasional assessment of sealant joints around sanitaryware, screens and niches.
Waterproofing comes before the finish
A common misconception is that microcement alone makes a shower enclosure waterproof. The sealer and coating system provide a water-resistant finished surface, but they should never replace proper tanking beneath in wet areas.
A technically sound shower room begins with the substrate and drainage. Pipework must be positioned and pressure-tested before walls are closed. Floors need the correct falls towards the waste, particularly where a wet-room shower floor is planned. Cement boards, floor preparation and movement control must be selected for the existing structure, whether that is a solid ground floor or suspended timber joists.
The shower area, bath surround and other exposed zones should then be waterproofed using an appropriate tanking system. Corners, pipe penetrations, wall-to-floor junctions and niches require particular care. These are the locations where water tends to find a route behind a finish if the detail is rushed.
Only after the background is stable, level and protected should the microcement application begin. The process usually involves base coats, reinforcement where required, fine finishing layers, sanding between stages and the specified sealers. Drying and curing times matter. Trying to accelerate the programme with unsuitable heating or poor ventilation can compromise the appearance and performance of the finished surface.
Wet rooms need careful design
Microcement can work beautifully in a wet room, but this is not the place to make assumptions. The floor must drain effectively, the shower screen position must be considered early, and the waste must be accessible if future maintenance is needed. A flush, open shower layout often requires more planning than a conventional tray and enclosure.
For a busy family bathroom, the practical question is how the room will be used every morning, not just how it will look in photographs. A partial screen may suit a spacious room but allow more spray onto doors and cabinetry. A well-designed shower zone, suitable extraction and a radiator or underfloor heating system that helps the room dry out will make the space far easier to live with.
Where microcement is most suitable
Microcement is especially effective when the aim is a cohesive, contemporary scheme. It can be a strong choice for an en-suite where visual clutter needs reducing, a loft conversion with a compact shower room, or a ground-floor bathroom designed around a level-access shower.
It can also suit older Kent homes where the existing room has uneven walls or a collection of awkward projections. Rather than trying to force a rigid tile pattern around every corner, a continuous finish can make the architecture feel more intentional. Preparation still remains essential: microcement follows the form beneath it, so walls that are out of true or damaged need correcting first.
There are situations where tiles may be the better decision. If you want a highly patterned surface, a glossy finish, or the ability to replace one damaged area with relative ease, tile offers more straightforward options. Households with large dogs, very young children or a heavily used secondary bathroom may also prefer the familiarity of porcelain tiles, particularly on floors exposed to frequent grit and knocks.
Microcement can be repaired, but invisible repairs are not always guaranteed because hand-applied surfaces have natural variation. This should be discussed honestly before choosing the finish. Its subtle tonal movement is part of its character, not a defect, but it will not look as uniform as a factory-made porcelain tile.
Planning the room around the finish
The best results come when microcement is chosen at the design stage, not added after the plumbing and layout have been finalised. Wall-hung furniture, recessed mirror cabinets, shower niches, flush plates and lighting positions all affect the detailing. Small decisions, such as where to place the transition between microcement and a painted wall, can make a significant difference to the final room.
Heating deserves equal attention. Underfloor heating is often a natural partner for a microcement floor because it removes the need for a large radiator and provides welcome comfort underfoot. The system needs to be properly designed for the room, with insulation and suitable controls, rather than treated as a decorative extra. In some bathrooms, a heated towel rail or bespoke radiator will still be needed to provide practical towel drying and support good ventilation.
Ventilation is another non-negotiable. A correctly sized extractor fan, ducted effectively to the outside, helps control condensation and protects every finish in the room, from microcement and cabinetry to mirrors and painted ceilings. This is particularly important in internal bathrooms with no opening window.
Cost, programme and choosing the right installer
Microcement bathrooms are generally a premium option because the material is only one part of the cost. The condition of the existing room, removal work, new pipework, electrics, tanking, floor levelling, drainage alterations and the complexity of the chosen layout all influence the proposal. A shower room requiring a new concealed valve, niche, wet-room former and underfloor heating involves a very different scope from applying microcement to a prepared cloakroom floor.
Ask for a detailed project scope that explains what is included beneath the visible finish. It should cover strip-out, substrate preparation, waterproofing, plumbing and electrical works, extraction, heating, fitting, finishing and final handover. This gives you a clearer basis for comparing quotations and prevents important technical work being treated as an afterthought.
It is also worth asking how the installer manages interfaces between trades. Microcement sits at the end of a chain of work, so the plastering, carpentry, pipework, drainage and waterproofing need to be coordinated. At The Bathroom Project, this is approached as one organised renovation journey, with the design and technical installation considered together rather than handed between separate contractors.
A well-planned microcement bathroom should feel effortless once it is complete. The route to that result is methodical: establish the layout, solve the plumbing and drainage, protect the room from water, prepare every surface properly and allow the finish the time and care it requires. Choose it because you value that calm, continuous character, and give it the technical foundation it deserves.
Planning your own bathroom renovation? Discuss the layout, installation and agreed quotation with The Bathroom Project. View our services or send an enquiry. We’ll reply by email or phone to answer questions and agree a suitable next step.
Planning your own bathroom?
Explore your ideas in 7 picture-led questions, add optional photos of your current room and enquire about a free home consultation. Skip anything you are unsure about.
Plan your bathroom